<a href="http://www.bloglovin.com/blog/6801451/?claim=9xeg4kx55pc">Follow my blog with Bloglovin</a>
Housekeeping. Carry on.
Friday, April 5, 2013
Monday, February 25, 2013
a quick project

This is the Dixie DIY Hot Cocoa Sweater - a free pattern available right here!

I needed something quick and easy after the trench coat project so I thought this would just about fit the bill. Especially since I already made one in December so I knew what I wanted to change about the pattern. Although I was too lazy to grab the other one to take pictures...it's just like this except brown, you can imagine it :)
This only comes in one size for 33-34" bust but by comparing the pattern to some of my shirts I was pretty confident the size would work. I'm more like a 37-38" bust depending on the day and which bra I'm wearing, for comparison. Anyway! Let's not talk inches anymore, shall we?
My only pattern changes were adding a few inches to the length (although I'm pondering taking a smidge back off and rehemming) and I cut the neck binding a bit longer. My first one tends to pucker a bit around the neckline so if your knit is very stable that piece might need some extra length. I hemmed it with some Steam a Seam and topstitched - straight stitch worked fine here because I don't really need to stretch out the hem to put it on or take it off. Fabric is double knit rayon blend.

It works with accessories!


I like it with drapy sweaters!


I even think I like it with a maxi skirt (top) and dress (bottom)! Although the dress is just to get an idea of the shape - I think the colors look bad together. Ignore the colors on that one. I was pulling all sorts of random things out of the closet to see what works with this.
Fun fact: I once helped a friend who was a photography major (I was a plain art major) with a project where he needed models. I'm all nice and whatnot so I said ok. So when he's ready to start taking pictures he's like, "Do this with your face." And I couldn't do it. I tried! I did! But I don't have model skills and I was really terrible at it. I was remembering this again when trying to take photos of myself: I have no idea what to do with my face in photos. So these are the least goofy looking ones :D
The jeans I'm wearing at the top there are some cheapo ones that I did a little surgery on and they still don't look great. The next project is jeans that actually fit me...gulp.
Tuesday, January 29, 2013
sewing review #1!
For a long time I've been meaning to start documenting my sewing projects. Partly so I remember how I did something when it turns out well (or not so well) and partly so I can review patterns. I read a ton of pattern reviews and I feel a bit guilty for getting so much use out of them but never posting my own. So this is a space to share all the side projects that I don't put on my art blog.

First up: trench coat #118 from November 2012 BurdaStyle. This is probably the most complicated thing I've ever made! Here's how I wore it on Sunday.
It's made from a waterproof cotton from Gorgeous Fabrics - still available. In some ways it was easy to work with - it would take a bulldozer to shift it off-grain - and in others it was challenging. Since it's waterproof I didn't trust any fusibles to stick to it and I decided to underline the whole thing in muslin so I had something to attach interfacing to. And it has a weird cardboard-y feel to it when sewing, so all the tight curves (collar and sleeve hems for example) tend to be a series of angles instead of a smooth curve. I used multiple layers of hair canvas in the collar and it still doesn't like to form a circle that well. Aaaand those sleeves were a bear to set in (although they went in beautifully in the muslin so it's definitely not a problem with the pattern).

I've never stabbed myself with pins so many times as on this project! Once a pin was in the fabric it stayed put, so if I ran into it with my hand the path of least resistance was into my skin. Ouch.

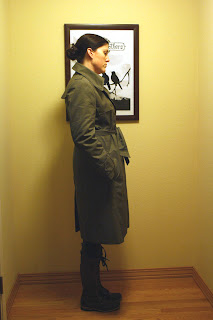
These aren't the best photos ever but if I have to wait for a sunny day in Seattle I'll be waiting until May... And it's absolutely pouring outside so the coat would be fine but I don't want to take my camera out in it :)

I did more topstitching than the pattern called for but I also left out all the piping since I figured it was plenty complicated enough.

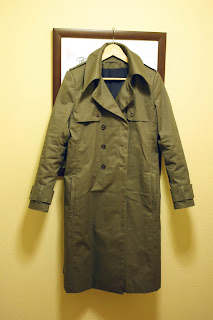
I didn't really realize how big that collar is until I finished the coat. It didn't seem that big in the muslin version for some reason. I think it's probably ok but I'm sort of paranoid that it looks odd because I was surprised by the size of it.
Major pattern changes were leaving out the piping, obviously, and I borrowed the front yoke from the other short version of this coat. I didn't care for the pointed yokes in front from the original version...I couldn't stop seeing little pointy boobs when I looked at it! Sorry. That was not very classy of me but that's all I can see now! And I just sort of rounded off the back yoke instead of the asymmetrical angled one from the pattern.
I used a size 42 but I took out some of the ease in the body of the coat and did a narrow-shoulder adjustment at the same time by cutting along the grainlines and overlapping them. I think I took out 2" total from the circumference which I determined from measuring one slightly smaller coat and one slightly larger coat than what I wanted this to be. I figured it needed to be big enough for a sweater underneath so that's how I determined the measurements.
And I used the length from the other long version of this coat and I still think it's pretty long.
I could not have been more mystified by the instructions to line the back vent so I just hand sewed the lining down. I have a coat that I bought with a similar vent and I put them side-by-side until this one looked pretty close to the old one. No, I didn't take a photo of it...it's not perfect but I did my best.
So there it is! I hope this is helpful to other people...I do love reading reviews and they've saved me from a lot of bad decisions :D

First up: trench coat #118 from November 2012 BurdaStyle. This is probably the most complicated thing I've ever made! Here's how I wore it on Sunday.
It's made from a waterproof cotton from Gorgeous Fabrics - still available. In some ways it was easy to work with - it would take a bulldozer to shift it off-grain - and in others it was challenging. Since it's waterproof I didn't trust any fusibles to stick to it and I decided to underline the whole thing in muslin so I had something to attach interfacing to. And it has a weird cardboard-y feel to it when sewing, so all the tight curves (collar and sleeve hems for example) tend to be a series of angles instead of a smooth curve. I used multiple layers of hair canvas in the collar and it still doesn't like to form a circle that well. Aaaand those sleeves were a bear to set in (although they went in beautifully in the muslin so it's definitely not a problem with the pattern).

I've never stabbed myself with pins so many times as on this project! Once a pin was in the fabric it stayed put, so if I ran into it with my hand the path of least resistance was into my skin. Ouch.


These aren't the best photos ever but if I have to wait for a sunny day in Seattle I'll be waiting until May... And it's absolutely pouring outside so the coat would be fine but I don't want to take my camera out in it :)

I did more topstitching than the pattern called for but I also left out all the piping since I figured it was plenty complicated enough.


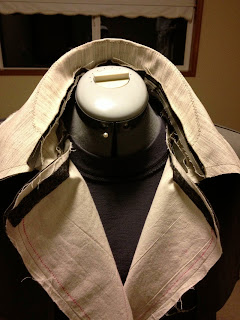
I didn't take a lot of pictures of the coat in progress but this shows how I interfaced the collar at least. I marked a roll line on the collar when I made the muslin and reinforced it with that smaller piece of hair canvas that's zigzagged on the top of the main piece. The black interfacing strips are the staystitching equivalent Burda recommends, from Fashion Sewing Supply interfacing as explained here.

I didn't really realize how big that collar is until I finished the coat. It didn't seem that big in the muslin version for some reason. I think it's probably ok but I'm sort of paranoid that it looks odd because I was surprised by the size of it.
Major pattern changes were leaving out the piping, obviously, and I borrowed the front yoke from the other short version of this coat. I didn't care for the pointed yokes in front from the original version...I couldn't stop seeing little pointy boobs when I looked at it! Sorry. That was not very classy of me but that's all I can see now! And I just sort of rounded off the back yoke instead of the asymmetrical angled one from the pattern.
I used a size 42 but I took out some of the ease in the body of the coat and did a narrow-shoulder adjustment at the same time by cutting along the grainlines and overlapping them. I think I took out 2" total from the circumference which I determined from measuring one slightly smaller coat and one slightly larger coat than what I wanted this to be. I figured it needed to be big enough for a sweater underneath so that's how I determined the measurements.
And I used the length from the other long version of this coat and I still think it's pretty long.
I could not have been more mystified by the instructions to line the back vent so I just hand sewed the lining down. I have a coat that I bought with a similar vent and I put them side-by-side until this one looked pretty close to the old one. No, I didn't take a photo of it...it's not perfect but I did my best.
So there it is! I hope this is helpful to other people...I do love reading reviews and they've saved me from a lot of bad decisions :D
Subscribe to:
Posts (Atom)